ウェブサイト制作で必ず登場する「見出し」。見出しのデザインは、サイトの印象、サイトのわかりやすさ、文章の読みやすさなどに影響します。
見出しのタグは、<h1><h2><h3><h4><h5><h6>と6種類あります。今回は見出し1~6を1セットとしてデザインしたCSS・サンプルコードをご紹介します。
コピペで利用できます。お気軽にご活用ください。
目次
使い方
HTML
HTMLはこちらをコピーしてご利用ください。
デザインサンプルはこのソースに対してCSSを適用させています。
<h1>H1見出し</h1>
<h2>H2見出し</h2>
<h3>H3見出し</h3>
<h4>H4見出し</h4>
<h5>H5見出し</h5>
<h6>H6見出し</h6>
見出しのHTMLタグは全部で6種類。詳しい内容はこちらを参照ください。
CSS
全てのデザインサンプルで、以下のCSSを適用しています。
h1,h2,h3,h4,h5,h6 {
  font-weight: normal;
  margin: 0;
  padding: 0;
}<h1><h2><h3><h4><h5><h6>のHタグは、CSSで何もデザインしていない状態でも、太字やマージン(余白)が設定されています。この既存設定をリセットしています。リセットした後、オリジナルのデザイン要素(太字やマージン)を加えていきます。
h1 {
  font-size: 40px;
}文字サイズは、<h1>は40px、<h2>は35px、<h3>は30px、<h4>は25px、<h5>は20px、<h6>は15px、と、<h1>から<h6>で徐々に小さくなるように指定しています。好みのサイズを指定してください。
デザインサンプル
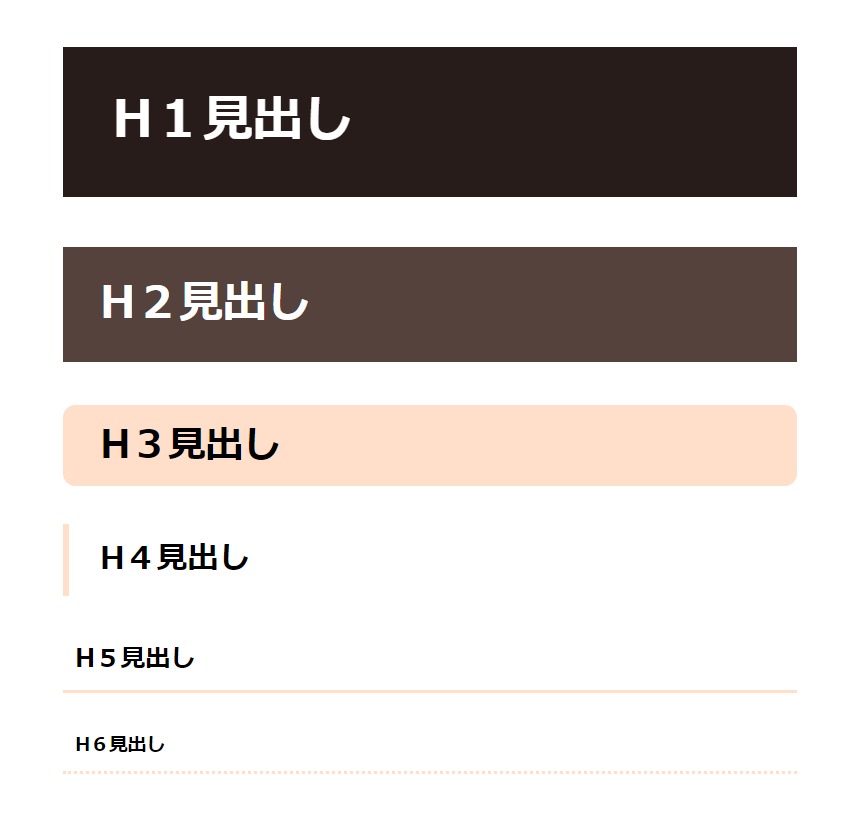
基本・シンプルな見出しデザイン1
/*リセット*/
h1,h2,h3,h4,h5,h6 {
  font-weight: normal;
  margin: 0;
  padding: 0;
}
/*デザイン*/
h1 {
  font-size: 40px;
  font-weight: bold;
  padding: 30px 40px;
  margin-bottom: 1em;
  color: #ffffff;
  background: #271c19;
}
h2 {
  font-size: 35px;
  font-weight: bold;
  padding: 20px 30px;
  margin-bottom: 1em;
  color: #ffffff;
  background: #55423d;
}
h3 {
  font-size: 30px;
  font-weight: bold;
  padding: 10px 30px;
  margin-bottom: 1em;
  border-radius: 10px;
  background: #ffdeca;
}
h4 {
  font-size: 25px;
  font-weight: bold;
  padding: 10px 30px 10px 25px;
  margin-bottom: 1em;
  border-left: 5px solid #ffdeca;
}
h5 {
  font-size: 20px;
  font-weight: bold;
  padding: 10px;
  margin-bottom: 1em;
  border-bottom: 3px solid #ffdeca;
}
h6 {
  font-size: 15px;
  font-weight: bold;
  padding: 10px;
  margin-bottom: 1em;
  border-bottom: 3px dotted #ffdeca;
}
h1~h6
margin-bottom: 1em;で見出しの下に1文字分の余白を入れています。
h3
border-radiusで背景の四隅を丸くしています。
h4
border-leftで左側だけ太めの枠線を付けています。
h5、h6
border-bottomで下線を付けています。solidで実線、dottedで点線になります。
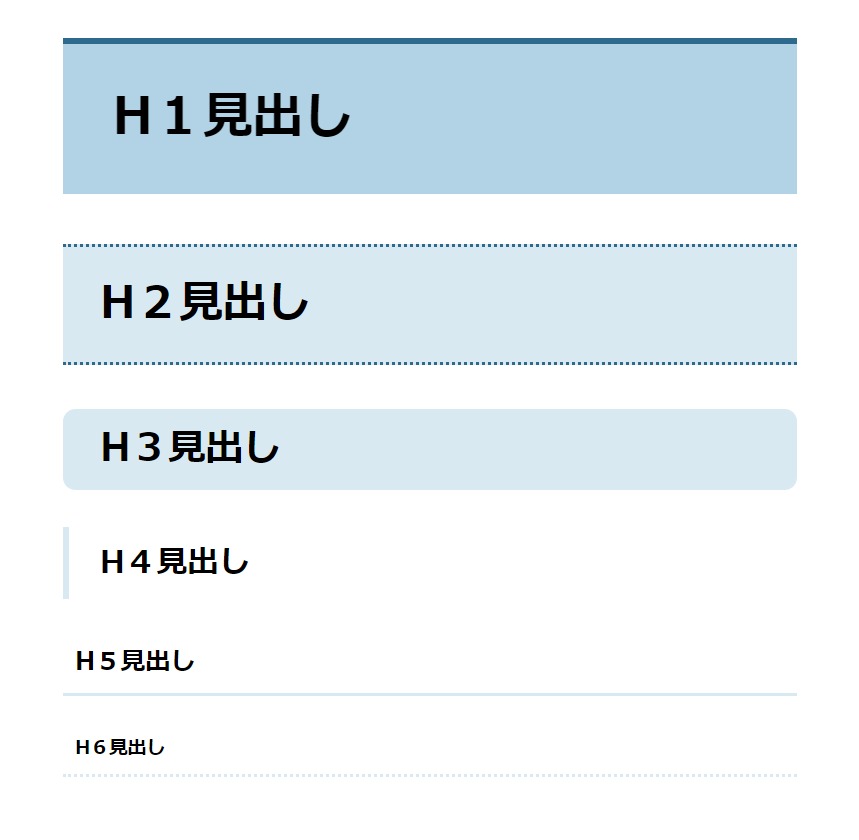
基本・シンプルな見出しデザイン2
/*リセット*/
h1,h2,h3,h4,h5,h6 {
  font-weight: normal;
  margin: 0;
  padding: 0;
}
/*デザイン*/
h1 {
  font-size: 40px;
  font-weight: bold;
  padding: 30px 40px;
  margin-bottom: 1em;
  border-top: 5px solid #2e6a8d;
  background: #b2d3e6;
}
h2 {
  font-size: 35px;
  font-weight: bold;
  padding: 20px 30px;
  margin-bottom: 1em;
  border-top: 3px dotted #2e6a8d;
  border-bottom: 3px dotted #2e6a8d;
  background: #d9e9f2;
}
h3 {
  font-size: 30px;
  font-weight: bold;
  padding: 10px 30px;
  margin-bottom: 1em;
  border-radius: 10px;
  background: #d9e9f2;
}
h4 {
  font-size: 25px;
  font-weight: bold;
  padding: 10px 30px 10px 25px;
  margin-bottom: 1em;
  border-left: 5px solid #d9e9f2;
}
h5 {
  font-size: 20px;
  font-weight: bold;
  padding: 10px;
  margin-bottom: 1em;
  border-bottom: 3px solid #d9e9f2;
}
h6 {
  font-size: 15px;
  font-weight: bold;
  padding: 10px;
  margin-bottom: 1em;
  border-bottom: 3px dotted #d9e9f2;
}
h1~h6
margin-bottom: 1em;で見出しの下に1文字分の余白を入れています。
h1
border-topで上部だけ太めの枠線を付けています。
h2
border-topとborder-bottomで上下に枠線を付けています。dottedで点線になります。
h3
border-radiusで背景の四隅を丸くしています。
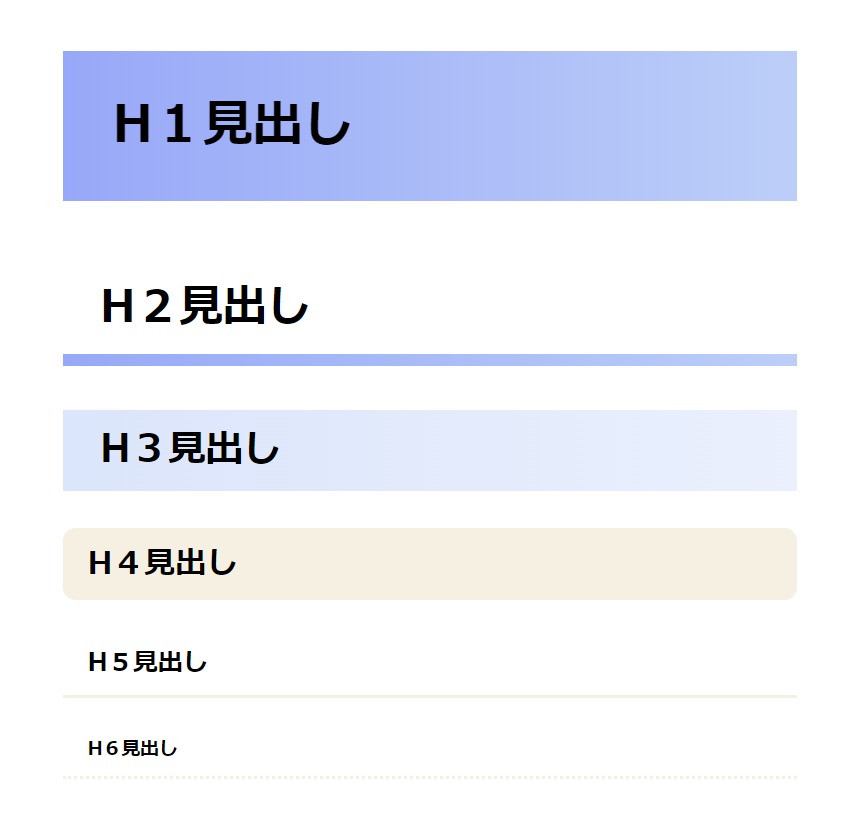
背景色をグラデーションにした見出しデザイン
/*リセット*/
h1,h2,h3,h4,h5,h6 {
  font-weight: normal;
  margin: 0;
  padding: 0;
}
/*デザイン*/
h1 {
  font-size: 40px;
  font-weight: bold;
  padding: 30px 40px;
  margin-bottom: 1em;
  background: linear-gradient(to right, #98A8F8, #BCCEF8);
}
h2 {
  position: relative;
  font-size: 35px;
  font-weight: bold;
  padding: 20px 30px;
  margin-bottom: 1em;
}
h2::after {
  position: absolute;
  content: '';
  left: 0;
  bottom: 0;
  width: 100%;
  height: 10px;
  background: linear-gradient(to right, #98A8F8, #BCCEF8);
}
h3 {
  font-size: 30px;
  font-weight: bold;
  padding: 10px 30px;
  margin-bottom: 1em;
  margin-bottom: 1em;
  background: linear-gradient(to right, #DBE5FB, #EAF0FD);
}
h4 {
  font-size: 25px;
  font-weight: bold;
  padding: 10px 20px;
  margin-bottom: 1em;
  border-radius: 10px;
  background: #F6F0E3;
}
h5 {
  font-size: 20px;
  font-weight: bold;
  padding: 10px 20px;
  margin-bottom: 1em;
  border-bottom: 3px solid #F6F0E3;
}
h6 {
  font-size: 15px;
  font-weight: bold;
  padding: 10px 20px;
  margin-bottom: 1em;
  border-bottom: 3px dotted #F6F0E3;
}
h1~h6
margin-bottom: 1em;で見出しの下に1文字分の余白を入れています。
h1、h2、h3
background: linear-gradient(to right, #カラーコード, #カラーコード);でグラデーションの背景色を付けています。to rightで左から右へのグラデーションを指定。to right, #左の色, #右の色となっています。
h2
::afterという疑似クラスを使って、h2のCSSの後(after)に、さらにCSSを追加しています。
疑似クラスを使う際は位置関係を指定しないとうまくいかないので、position: relative;とposition: absolute;で指定しています。手前(h2)の相対的(relative)な位置に対して、疑似クラス(h2::after)の要素は絶対的(absolute)な位置を指定します。疑似クラス(h2::after)にグラデーションの背景色を付けています。
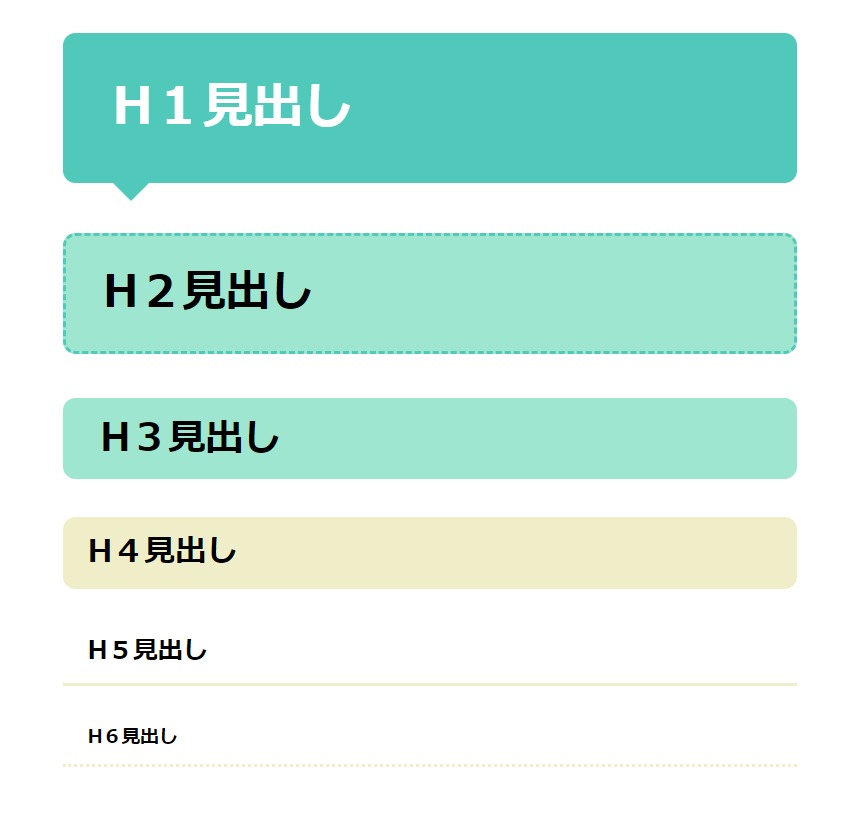
吹き出し風の見出しデザイン
/*リセット*/
h1,h2,h3,h4,h5,h6 {
  font-weight: normal;
  margin: 0;
  padding: 0;
}
/*デザイン*/
h1 {
  position: relative;
  font-size: 40px;
  font-weight: bold;
  padding: 30px 40px;
  margin-bottom: 1em;
  color: #ffffff;
  border-radius: 10px;
  background: #50C9BA;
}
h1::after {
  position: absolute;
  content: '';
  left: 1em;
  bottom: -28px;
  width: 0;
  height: 0;
  border-top: 15px solid #50C9BA;
  border-right: 15px solid transparent;
  border-left: 15px solid transparent;
  border-bottom: 15px solid transparent;
}
h2 {
  font-size: 35px;
  font-weight: bold;
  padding: 20px 30px;
  margin-bottom: 1em;
  border-radius: 10px;
  border: 3px dashed #50C9BA;
  background: #9EE6CF;
}
h3 {
  font-size: 30px;
  font-weight: bold;
  padding: 10px 30px;
  margin-bottom: 1em;
  border-radius: 10px;
  background: #9EE6CF;
}
h4 {
  font-size: 25px;
  font-weight: bold;
  padding: 10px 20px;
  margin-bottom: 1em;
  border-radius: 10px;
  background: #F0EEC9;
}
h5 {
  font-size: 20px;
  font-weight: bold;
  padding: 10px 20px;
  margin-bottom: 1em;
  border-bottom: 3px solid #F0EEC9;
}
h6 {
  font-size: 15px;
  font-weight: bold;
  padding: 10px 20px;
  margin-bottom: 1em;
  border-bottom: 3px dotted #F0EEC9;
}
h1~h6
margin-bottom: 1em;で見出しの下に1文字分の余白を入れています。
h1
::afterという疑似クラスを使って、h1のCSSの後(after)に、さらにCSSを追加しています。
疑似クラスを使う際は位置関係を指定しないとうまくいかないので、position: relative;とposition: absolute;で指定しています。手前(h1)の相対的(relative)な位置に対して、疑似クラス(h1::after)の要素は絶対的(absolute)な位置を指定します。
吹き出しの三角形部分は、width: 0;とheight: 0;とborder:で実現しています。細かな説明は難しいので省略しますが…。幅なし・高さなし・同じ太さの枠線を作ると三角形が4つ組み合わさった四角形の表示になります。三角形3つ分の背景色をtransparent(透明)にすると三角形が1つだけ残るというものです。
h1~h4
border-radiusで背景の四隅を丸くしています。
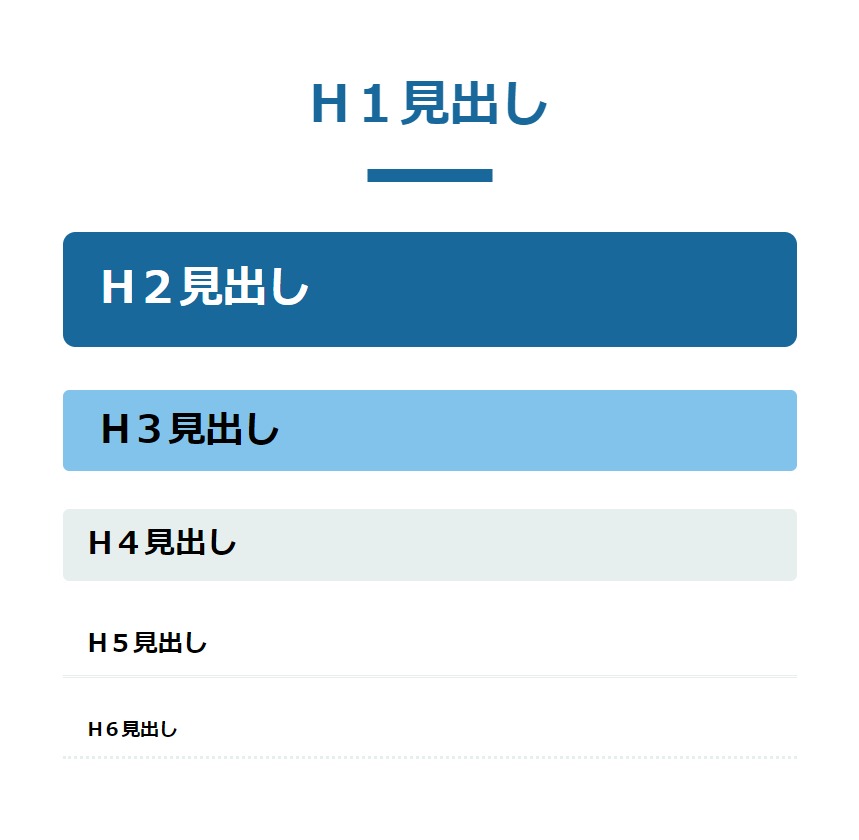
中央寄せ・下線のワンポイント入り見出しデザイン
/*リセット*/
h1,h2,h3,h4,h5,h6 {
  font-weight: normal;
  margin: 0;
  padding: 0;
}
/*デザイン*/
h1 {
  position: relative;
  font-size: 40px;
  font-weight: bold;
  text-align: center;
  padding: 30px;
  margin-bottom: 1em;
  color: #18689B;
}
h1::after {
  position: absolute;
  content: '';
  left: 50%;
  bottom: 0;
  transform: translateX(-50%);
  width: 100px;
  height: 10px;
  background: #18689B;
}
h2 {
  font-size: 35px;
  font-weight: bold;
  padding: 20px 30px;
  margin-bottom: 1em;
  color: #ffffff;
  border-radius: 10px;
  background: #18689B;
}
h3 {
  font-size: 30px;
  font-weight: bold;
  padding: 10px 30px;
  margin-bottom: 1em;
  border-radius: 5px;
  background: #82C3EC;
}
h4 {
  font-size: 25px;
  font-weight: bold;
  padding: 10px 20px;
  margin-bottom: 1em;
  border-radius: 5px;
  background: #E7EFEE;
}
h5 {
  font-size: 20px;
  font-weight: bold;
  padding: 10px 20px;
  margin-bottom: 1em;
  border-bottom: 3px double #E7EFEE;
}
h6 {
  font-size: 15px;
  font-weight: bold;
  padding: 10px 20px;
  margin-bottom: 1em;
  border-bottom: 3px dotted #E7EFEE;
}
h1~h6
margin-bottom: 1em;で見出しの下に1文字分の余白を入れています。
h1
::afterという疑似クラスを使って、h1のCSSの後(after)に、さらにCSSを追加しています。
疑似クラスを使う際は位置関係を指定しないとうまくいかないので、position: relative;とposition: absolute;で指定しています。手前(h1)の相対的(relative)な位置に対して、疑似クラス(h1::after)の要素は絶対的(absolute)な位置を指定します。left: 50%;とtransform: translateX(-50%);で中央寄せになります。
h2、h3、h4
border-radiusで背景の四隅を丸くしています。
h5、h6
border-bottomで下線を付けています。doubleで二重線、dottedで点線になります。
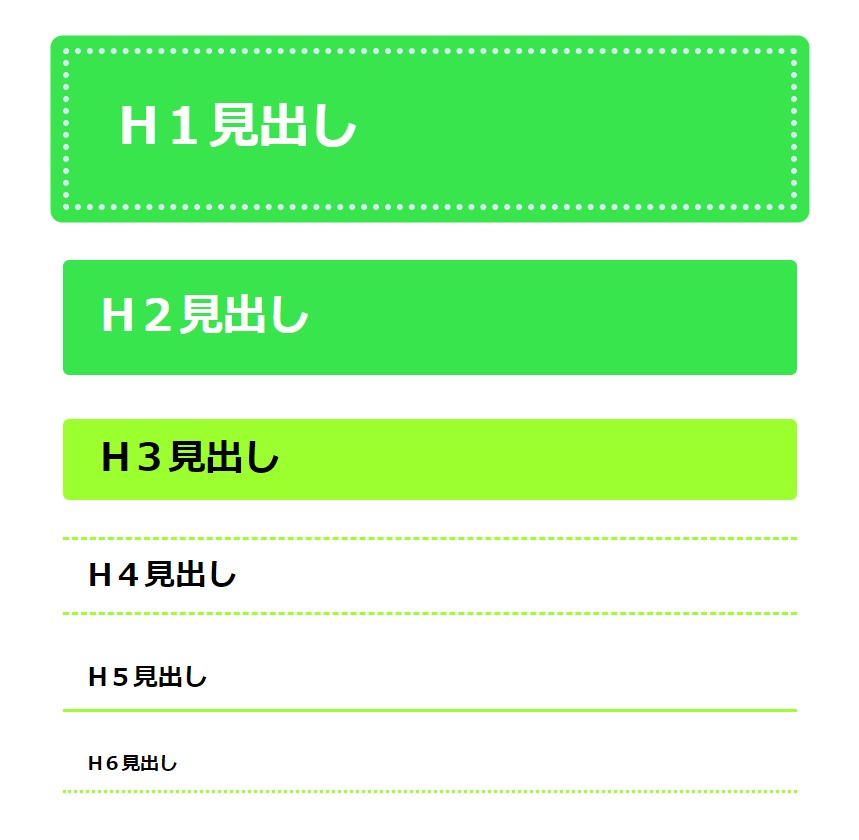
縫い目風の見出しデザイン
/*リセット*/
h1,h2,h3,h4,h5,h6 {
  font-weight: normal;
  margin: 0;
  padding: 0;
}
/*デザイン*/
h1 {
  font-size: 40px;
  font-weight: bold;
  padding: 30px 40px;
  margin-bottom: 1em;
  color: #ffffff;
  border-radius: 3px;
  border: 5px dotted #ffffff;
  background: #38E54D;
  box-shadow: 0 0 0 10px rgba(56, 229, 77, 1);
}
h2 {
  font-size: 35px;
  font-weight: bold;
  padding: 20px 30px;
  margin-bottom: 1em;
  color: #ffffff;
  border-radius: 5px;
  background: #38E54D;
}
h3 {
  font-size: 30px;
  font-weight: bold;
  padding: 10px 30px;
  margin-bottom: 1em;
  border-radius: 5px;
  background: #9CFF2E;
}
h4 {
  font-size: 25px;
  font-weight: bold;
  padding: 10px 20px;
  margin-bottom: 1em;
  border-top: 3px dashed #9CFF2E;
  border-bottom: 3px dashed #9CFF2E;
}
h5 {
  font-size: 20px;
  font-weight: bold;
  padding: 10px 20px;
  margin-bottom: 1em;
  border-bottom: 3px solid #9CFF2E;
}
h6 {
  font-size: 15px;
  font-weight: bold;
  padding: 10px 20px;
  margin-bottom: 1em;
  border-bottom: 3px dotted #9CFF2E;
}
h1~h6
margin-bottom: 1em;で見出しの下に1文字分の余白を入れています。
h1
まず、borderで枠線を付けています。dottedで点線(縫い目風)になります。点線の外側の色は、box-shadowで影を付けることで実現しています。box-shadow: 左右の影のサイズ、上下の影のサイズ、ぼかしのサイズ、広がりのサイズ、カラーコード;となっています。全方向への広がりだけ使って(実線のような)影が作られています。
h2、h3
border-radiusで背景の四隅を丸くしています。
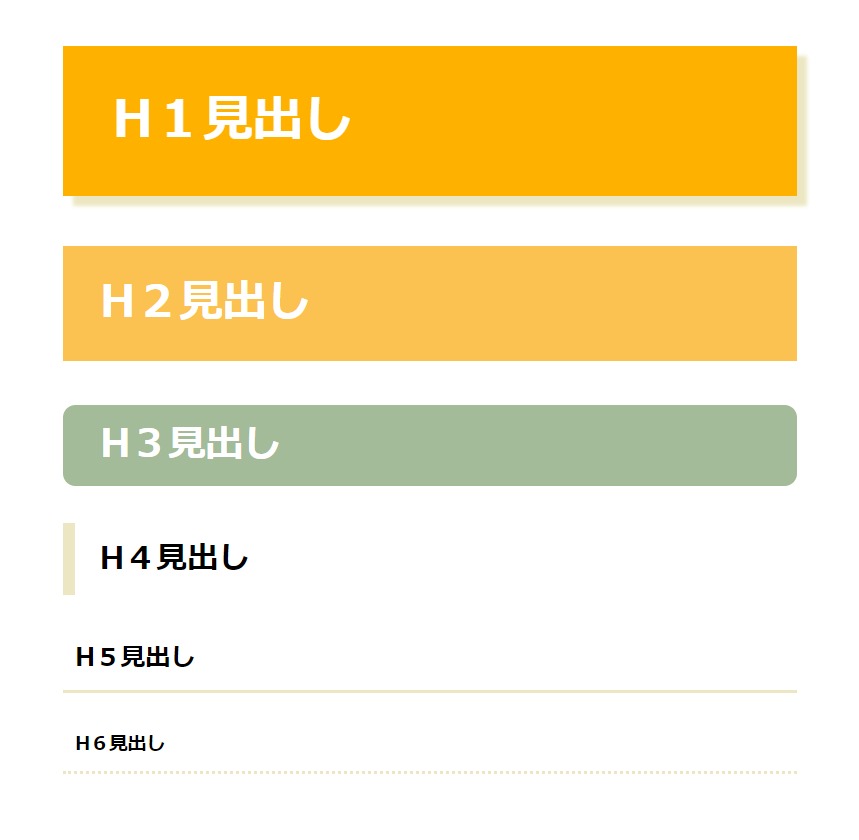
影付きの見出しデザイン
/*リセット*/
h1,h2,h3,h4,h5,h6 {
  font-weight: normal;
  margin: 0;
  padding: 0;
}
/*デザイン*/
h1 {
  font-size: 40px;
  font-weight: bold;
  padding: 30px 40px;
  margin-bottom: 1em;
  color: #ffffff;
  background: #FFB100;
  box-shadow: 8px 8px 3px 0px rgba(236, 231, 194, 1);
}
h2 {
  font-size: 35px;
  font-weight: bold;
  padding: 20px 30px;
  margin-bottom: 1em;
  color: #ffffff;
  background: #FBC252;
}
h3 {
  font-size: 30px;
  font-weight: bold;
  padding: 10px 30px;
  margin-bottom: 1em;
  color: #ffffff;
  border-radius: 10px;
  background: #A3BB98;
}
h4 {
  font-size: 25px;
  font-weight: bold;
  padding: 10px 30px 10px 20px;
  margin-bottom: 1em;
  border-left: 10px solid #ECE7C2;
}
h5 {
  font-size: 20px;
  font-weight: bold;
  padding: 10px;
  margin-bottom: 1em;
  border-bottom: 3px solid #ECE7C2;
}
h6 {
  font-size: 15px;
  font-weight: bold;
  padding: 10px;
  margin-bottom: 1em;
  border-bottom: 3px dotted #ECE7C2;
}
h1~h6
margin-bottom: 1em;で見出しの下に1文字分の余白を入れています。
h1
box-shadowで影を付けています。box-shadow: 左右の影のサイズ、上下の影のサイズ、ぼかしのサイズ、広がりのサイズ、カラーコードとなっています。
h3
border-radiusで背景の四隅を丸くしています。
h4
border-leftで左側だけ太めの枠線を付けています。
下線の色を工夫した見出しデザイン
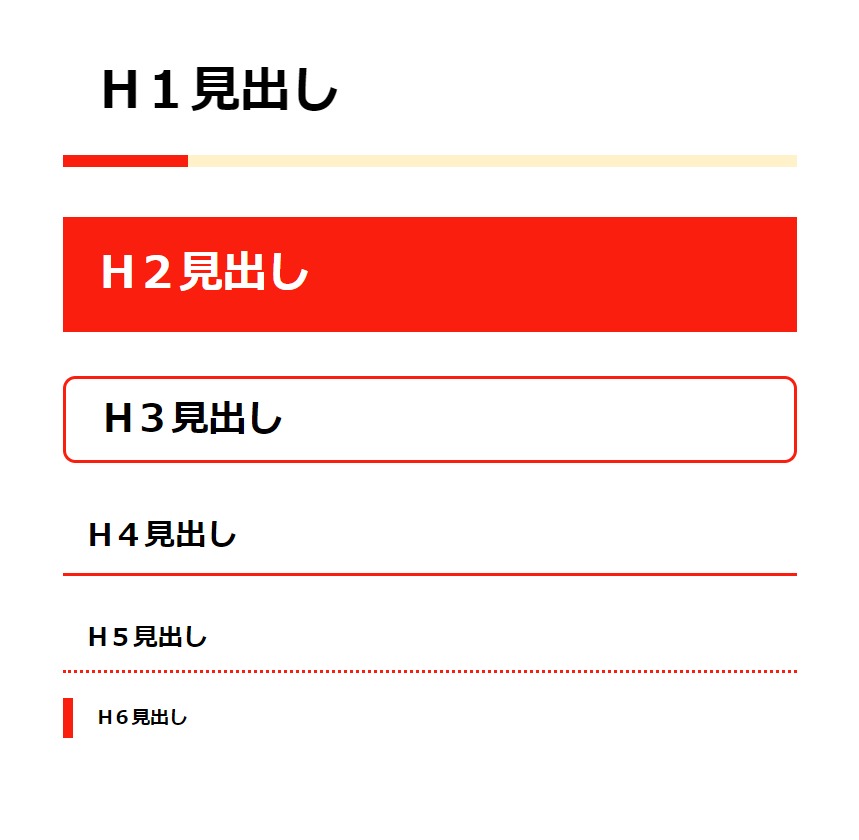
/*リセット*/
h1,h2,h3,h4,h5,h6 {
  font-weight: normal;
  margin: 0;
  padding: 0;
}
/*デザイン*/
h1 {
  position: relative;
  font-size: 40px;
  font-weight: bold;
  padding: 30px;
  margin-bottom: 1em;
}
h1::before {
  position: absolute;
  content: '';
  left: 0;
  bottom: 0;
  width: 100px;
  height: 10px;
  background: #FA1E0E;
  z-index: 1;
}
h1::after {
  position: absolute;
  content: '';
  left: 0;
  bottom: 0;
  width: 100%;
  height: 10px;
  background: #FFF1CA;
}
h2 {
  font-size: 35px;
  font-weight: bold;
  padding: 20px 30px;
  margin-bottom: 1em;
  color: #ffffff;
  background: #FA1E0E;
}
h3 {
  font-size: 30px;
  font-weight: bold;
  padding: 10px 30px;
  margin-bottom: 1em;
  border-radius: 10px;
  border: 3px solid #FA1E0E;
}
h4 {
  font-size: 25px;
  font-weight: bold;
  padding: 10px 20px;
  margin-bottom: 1em;
  border-bottom: 3px solid #FA1E0E;
}
h5 {
  font-size: 20px;
  font-weight: bold;
  padding: 10px 20px;
  margin-bottom: 1em;
  border-bottom: 3px dotted #FA1E0E;
}
h6 {
  font-size: 15px;
  font-weight: bold;
  padding: 5px 20px;
  margin-bottom: 1em;
  border-left: 8px solid #FA1E0E;
}
h1~h6
margin-bottom: 1em;で見出しの下に1文字分の余白を入れています。
h1
::beforeと::afterという疑似クラスをセットで使って、h1のCSSの前(before)と後(after)に、さらにCSSを追加しています。
疑似クラスを使う際は位置関係を指定しないとうまくいかないので、position: relative;とposition: absolute;で指定しています。手前(h1)の相対的(relative)な位置に対して、疑似クラス(h1::before h1::after)の要素は絶対的(absolute)な位置を指定します。
2つの疑似クラスの位置はleft: 0;、bottom: 0;で、同じ位置に重ねています。z-index: 1;で::beforeの方が前面になるようにしています。::beforeにwidth: 100px;の赤の背景色を、::afterにwidth: 100%;のクリーム色の背景色を付けています。
h3
border-radiusで背景の四隅を丸くしています。
h6
border-leftで左側だけ太めの枠線を付けています。
レスポンシブデザイン対応について
上記のデザインサンプルは、このままでもレスポンシブデザインに対応しています。ただ、スマホでは文字サイズが若干大きかったりするので、文字サイズ(font-size)また余白(padding)は、自身のサイトや好みに合わせて若干調整すると良いと思います。例えばこちら。
/*パソコン(PC)用の記述*/


@media only screen and (max-width: 599px) {
/**スマートフォン(SP)用の記述*/
  h1 {
   font-size: 31px;
  }
  h2 {
   font-size: 28px;
  }
  h3 {
   font-size: 25px;
  }
  h4 {
   font-size: 21px;
  }
  h5 {
   font-size: 18px;
  }
  h6 {
   font-size: 15px;
  }
}
ブラウザの横幅が600px以上のときはパソコンやタブレット用のデザインに。
ブラウザの横幅が599px以下のときはスマートフォン用のデザインに。
見出しひとつひとつのデザインは無限にありますが、見出し1~6まで(または見出し3までなど必要なとこまで)をセットでうまくデザインできると良いですね。
